UE
环境要求
- iOS 12 及更高版本
- Andorid 8 及更高版本
- UE4.26 及 UE4.27
接入前准备
下载 XDGSDK UE,将需要的 plugin 拷贝入您的游戏项目中,plugin 构成:
- AndroidX				AndroidX 支持
- XDGCommon             核心模块
- XDGAccount            登录模块
- XDGPayment            支付模块
- XDGSharing            分享模块
- XDGAnnounment         公告模块
- XDGReport             举报模块
- XDGMainland			国内包依赖模块,二选一
- XDGOverseas			海外包依赖模块,二选一
- TapCommon             TapSDK 核心模块,被所有模块所依赖
- TapBootstrap          TDSUser 模块 及 TapSDK 初始化入口模块
- LeanCloud             LeanCloud 业务模块,被某些模块(TapBootstrap 等)所依赖
- AntiAddiction         防沉迷模块,可选
- TapDB                 数据仓库模块,可选
- TapMoment             动态模块,可选
- XDADs                 安卓国内广告模块,可选
- TapSupport			公告模块,可选
项目配置
1. 游戏添加引擎模块依赖
目前所依赖的引擎模块:
- "Json"
- "JsonUtilities"
- "Slate"
- "SlateCore"
- "UMG"
2. 配置XDConfig
v6.19.0 之前
配置XDConfig有两种方案,根据自己的情况选择一种:
1. 将 XDConfig.json 转成 DefaultXDConfig.ini
如果你获取了一份 XDConfig.json 文件,那么可以通过 python 脚本来转换成 DefaultXDConfig.ini。脚本所在的路径:XDGCommon/Script/xdconfig_json2ini.py,使用方法如下:
python xdconfig_json2ini.py your_config_dir/XDConfig.json
或
python3 xdconfig_json2ini.py your_config_dir/XDConfig.json
如果运行没有报错,说明你成功了,你应该在脚本的同级目录获取到 DefaultXDConfig.ini 文件,将该文件拖到项目的 Configs 目录就行了
2. 在项目的配置中设置 XDConfig
启用XDSDK插件后,我们可以在项目设置的插件栏中找到 XDSDK Config,如下图所示:
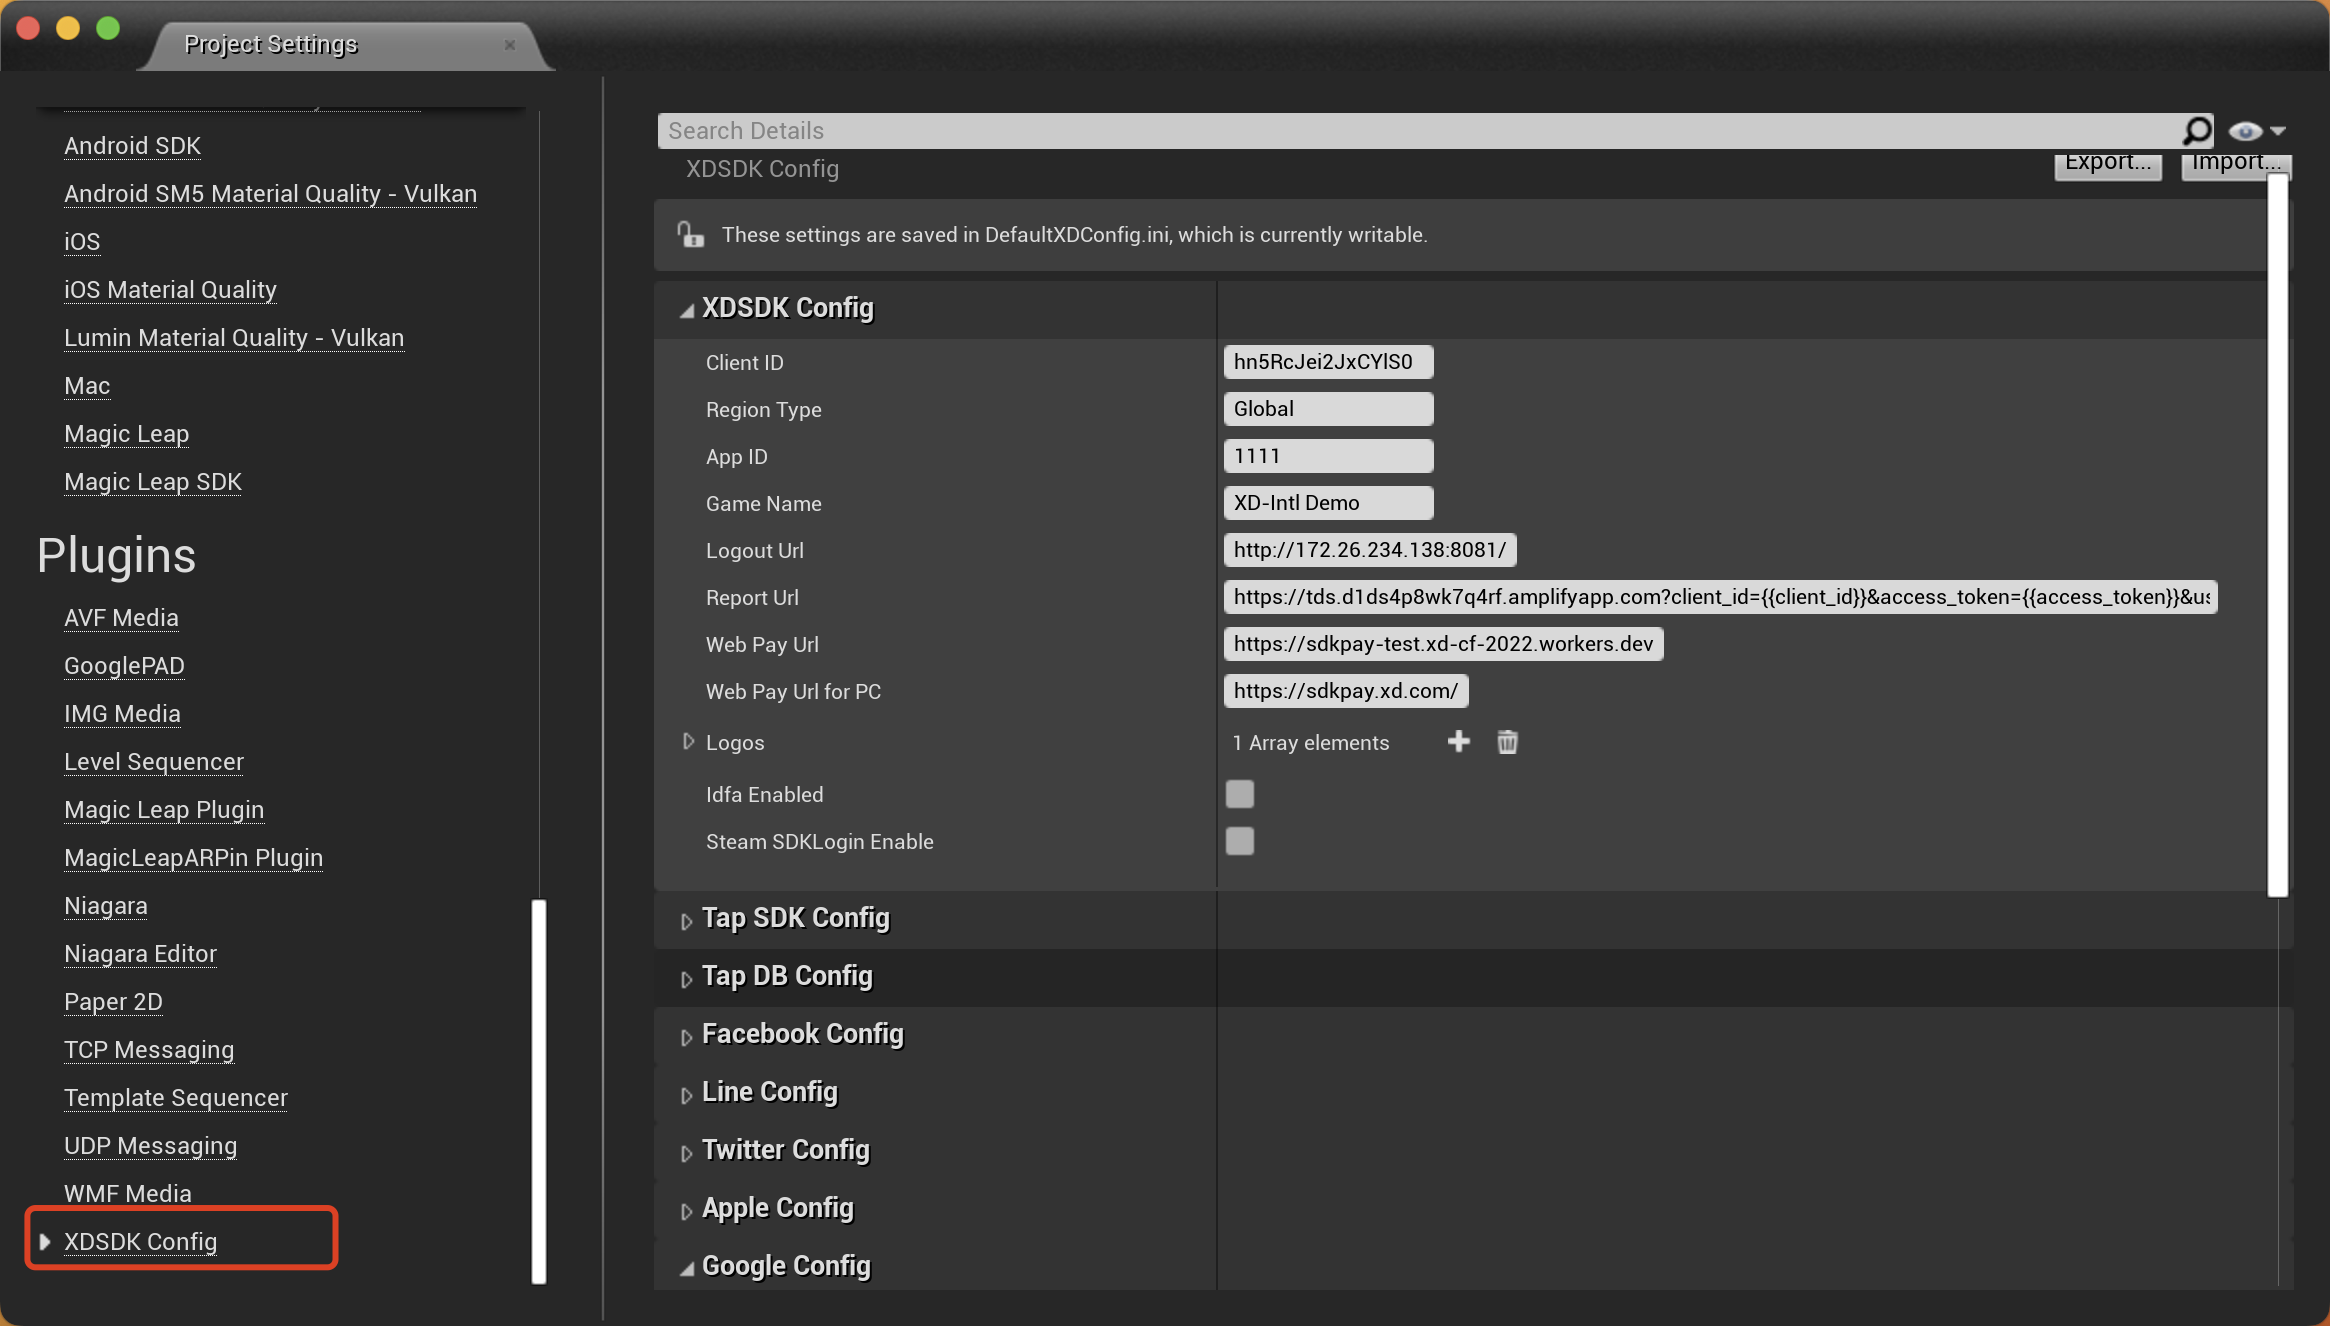
可以参考前文中的 XDConfig.json 文件 来配置自己项目,只需要配置自己所需要的,不需要应填写为空。
v6.19.0(包含) 之后
配置XDConfig有两种方案,根据自己的情况选择一种:
1. 将 XDConfig.json 转成 DefaultXDGConfig.ini
如果你获取了一份 XDConfig.json 文件,那么可以通过 Commandlet 来转换成转化 DefaultXDGConfig.ini。命令行示例:
"C:\Program Files\Epic Games\UE_4.26\Engine\Binaries\Win64\UE4Editor-Win64-DebugGame.exe" "C:\Users\XINDONG\Documents\WorkSpace\XD\XDSDK\XDSDK.uproject"-run=IniGenerate -XDConfig="C:/Users/XINDONG/Desktop/XDConfig.json"
运行成功,转化后的 DefaultXDGConfig.ini 放在 Config/DefaultXDGConfig.ini
2. 在项目的配置中设置 XDConfig
启用XDSDK插件后,我们可以在项目设置的插件栏中找到 XDGConfig,如下图所示:
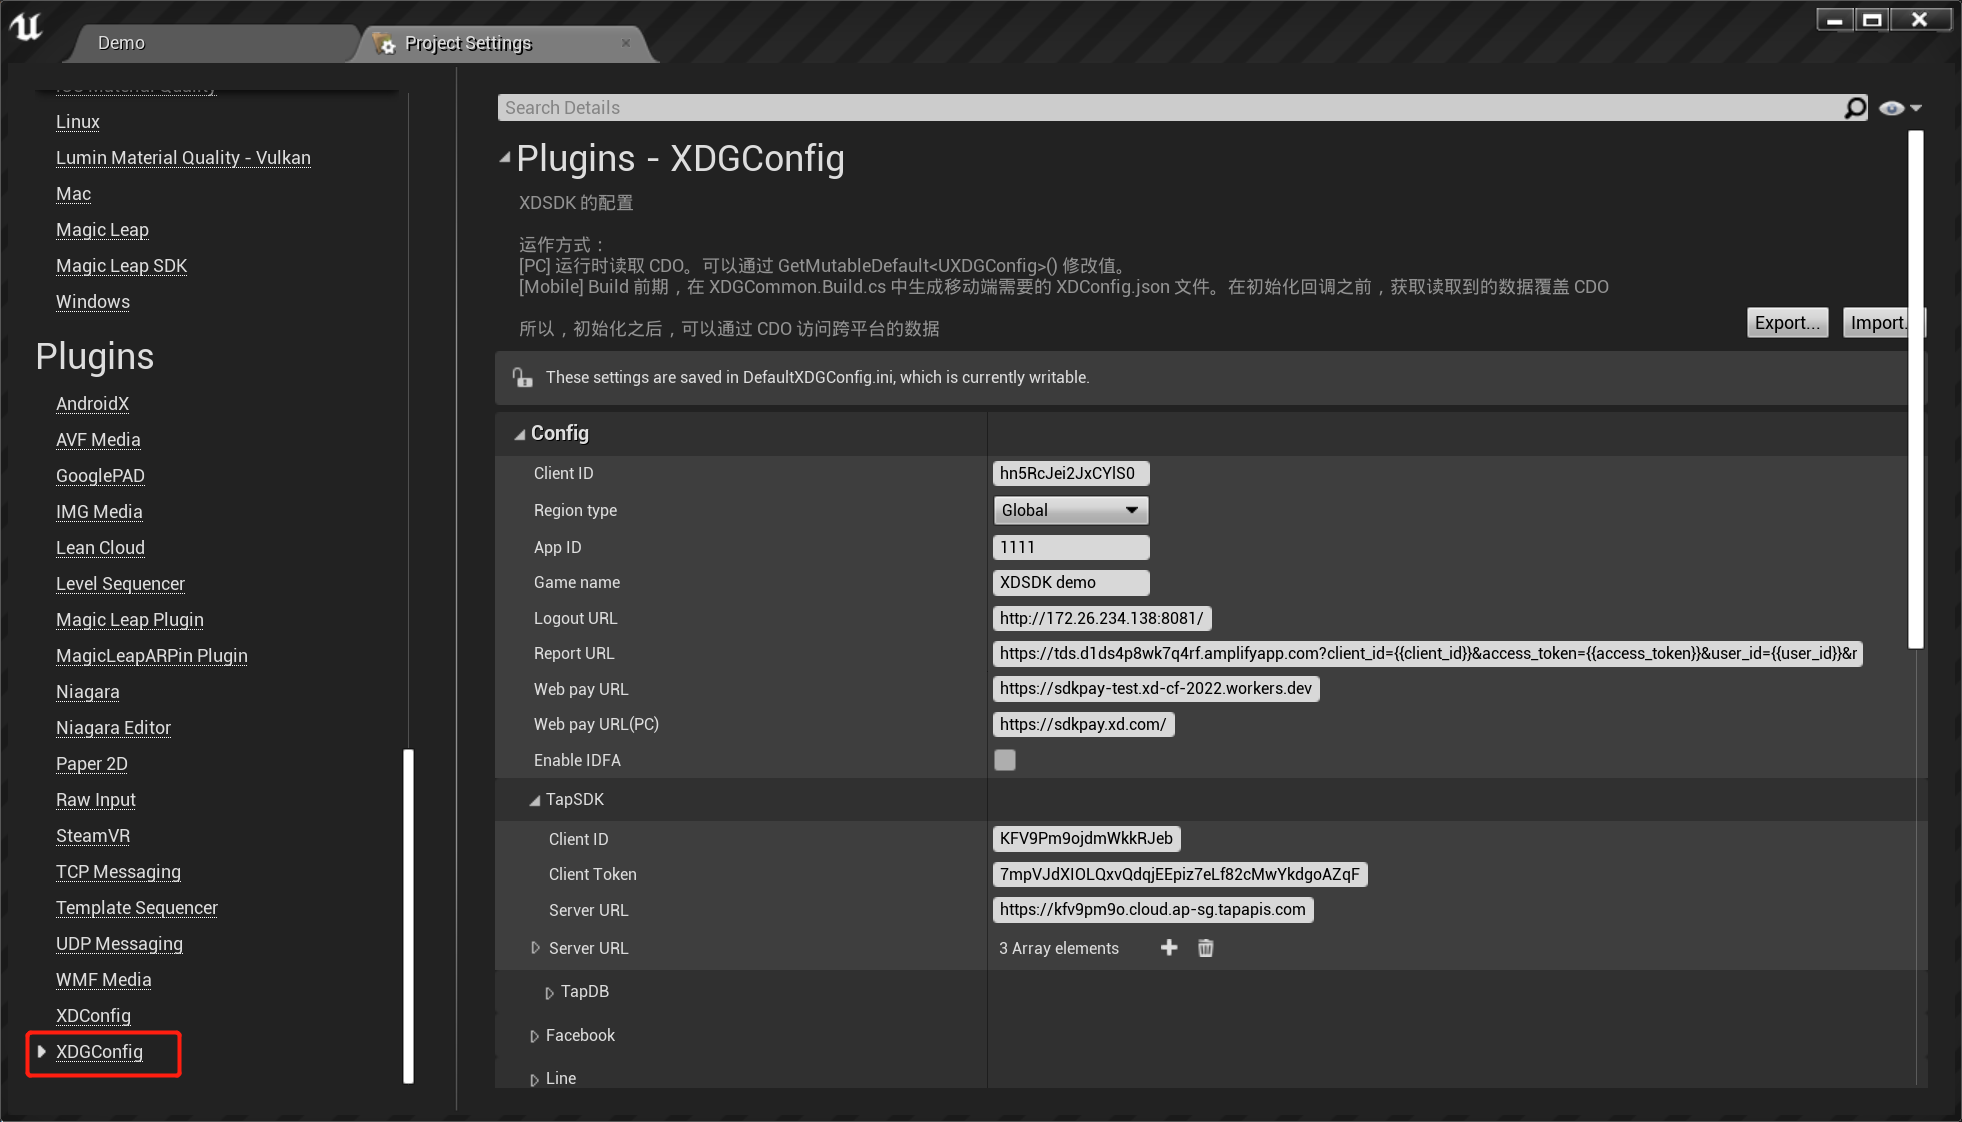
可以参考前文中的 XDConfig.json 文件 来配置自己项目,只需要配置自己所需要的,不需要应填写为空。
XDConfig 在 6.19.0 之后废弃 改使用 XDGConfig 升级方法参考 升级指南
移动端配置参考
由于移动端有各自的权限特性,所以在 Unreal 中可以利用 UPL 来达成各项配置。我们可以在项目文件中生成 YourProject_iOS_UPL.xml 和 YourProject_Android_UPL.xml 值配置成自己的参数,可以参考 XDSDK Demo中的 Demo_iOS_UPL.xml 和 Demo_Android_UPL.xml。
在 buidl.cs 文件中加载 UPL 的代码
if (Target.Platform == UnrealTargetPlatform.Android){
    PrivateDependencyModuleNames.AddRange(
        new string[]
        {
            "Launch"
        }
    );
    AdditionalPropertiesForReceipt.Add(
        "AndroidPlugin",
        Path.Combine(ModuleDirectory, "Demo_Android_UPL.xml")
    );
}

if (Target.Platform == UnrealTargetPlatform.IOS)
{
    AdditionalPropertiesForReceipt.Add(
        "IOSPlugin",
        Path.Combine(ModuleDirectory, "Demo_iOS_UPL.xml")
    );
}
下面各端的配置详解
iOS配置详解 - 拷贝第三方配置文件
可以建立一个文件夹叫 assets
- assets 放入拷贝到项目根目录的文件,例如 GoogleService-Info.plist 等文件
最后通过 UPL 将文件拷贝过去
<init>
    <copyDir src="$S(PluginDir)/Your Path/assets/" dst="$S(BuildDir)/"/>
</init>
iOS配置详解 - info.plist 设置
iOS 中大多数配置在 iOS 项目的 info.plist 文件中,我们可以在 UPL 中增加如下代码来给 info.plist 添加配置
<iosPListUpdates>
    <addElements tag="dict" once="true">
        <!-- 添加配置文件的地方 -->
    </addElements>
</iosPListUpdates>
1. 权限配置
如果使用手机的功能,例如照相机、照片、麦克风等,都是需要申请用户同意的,所以需要配置需要的权限,并提供文案解释使用该权限的原因,代码如下
<key>NSCameraUsageDescription</key>
<string>想要使用相机</string>
<key>NSMicrophoneUsageDescription</key>
<string>想要使用麦克风</string>
<key>NSPhotoLibraryUsageDescription</key>
<string>想要访问相册</string>
<key>NSUserTrackingUsageDescription</key>
<string>想要获取IDFA</string>
2. URLSchemes设置
设置了 URLSchemes,可以通过 URL 的 Scheme 来唤起的你的 APP,如果使用了三方登录、分享等功能,在跳转三方 APP 后需要重新拉起你的 APP,所以需要配置好与第三方约定好的 URLScheme,示例如下(里面的参数改成自己的配置,不需要的可以删掉):
<key>CFBundleURLTypes</key>
<array>
    <!-- Line 相关 -->
    <dict>
    <key>CFBundleTypeRole</key>
    <string>Editor</string>
    <key>CFBundleURLName</key>
    <string>line</string>
    <key>CFBundleURLSchemes</key>
    <array>
        <!-- 这里注意下,最终是应用的 iOS 包名 前拼接上 `ine3rdp.` 的形式,例如:line3rdp.com.xd.sdkdemo 不包含大括号 -->
        <string>line3rdp.{Bundle ID}</string>
    </array>
    </dict>
    <!-- Facebook 相关 -->
    <dict>
    <key>CFBundleTypeRole</key>
    <string>Editor</string>
    <key>CFBundleURLName</key>
    <string>facebook</string>
    <key>CFBundleURLSchemes</key>
    <array>
        <!-- 这里注意下,最终是 facebook__app_id 前拼接上 `fb` 的形式,例如:fb89290xxxx532077 不包含大括号 -->
        <string>fb{facebook__app_id}</string>
    </array>
    </dict>
    <!-- Google 相关 -->
    <dict>
    <key>CFBundleTypeRole</key>
    <string>Editor</string>
    <key>CFBundleURLName</key>
    <string>google</string>
    <key>CFBundleURLSchemes</key>
    <array>
        <!-- 这里需要注意,填写的是反转的应用客户端 ID,比如客户端 ID 为:954987102858-0lpot39eu0emn0t66u31gacdjl6pau4a.apps.googleusercontent.com
            则这里应该填写:com.googleusercontent.apps.954987102858-0lpot39eu0emn0t66u31gacdjl6pau4a 不包含大括号 -->
        <string>{反转的 Google 客户端 ID}</string>
    </array>
    </dict>
    <!-- TapTap 相关 -->
    <dict>
    <key>CFBundleTypeRole</key>
    <string>Editor</string>
    <key>CFBundleURLName</key>
    <string>taptapinte</string>
    <key>CFBundleURLSchemes</key>
    <array>
        <!-- 这里注意下,最终是 tapsdk__client_id 前拼接上 `tt` 的形式,例如:ttFwFdCxxxxxxxQDQwQN 不包含大括号 -->
        <string>tt{tapsdk__client_id}</string>
    </array>
    </dict>
    <!-- Twitter 相关 -->
    <dict>
    <key>CFBundleTypeRole</key>
    <string>Editor</string>
    <key>CFBundleURLName</key>
    <string>twitter-auth</string>
    <key>CFBundleURLSchemes</key>
    <array>
        <!-- 这里注意下,最终是 twitter__consumer_key 前拼接上 `tdsg.twitter.` 的形式,例如:tdsg.twitter.feOTAapnuXNFxxxx2LktBnCpeF 不包含大括号 -->
        <string>tdsg.twitter.{twitter__consumer_key}</string>
    </array>
    </dict>
    <!-- 微信 相关 -->
    <dict>
    <key>CFBundleTypeRole</key>
    <string>Editor</string>
    <key>CFBundleURLName</key>
    <string>wechat</string>
    <key>CFBundleURLSchemes</key>
    <array>
        <!-- 这里注意下,直接使用 wechat__app_id 即可 -->
        <string>{wechat__app_id}</string>
    </array>
    </dict>
    <!-- QQ 相关 -->
    <dict>
    <key>CFBundleTypeRole</key>
    <string>Editor</string>
    <key>CFBundleURLName</key>
    <string>qq</string>
    <key>CFBundleURLSchemes</key>
    <array>
        <!-- 这里注意下,最终是 qq__app_id 前拼接上 `tencent` 的形式,例如:tencent11068xxxx558 不包含大括号 -->
        <string>tencent{qq__app_id}</string>
    </array>
    </dict>
    <!-- 微博 相关 -->
    <dict>
    <key>CFBundleTypeRole</key>
    <string>Editor</string>
    <key>CFBundleURLName</key>
    <string>weibo</string>
    <key>CFBundleURLSchemes</key>
    <array>
        <!-- 这里注意下,最终是 weibo__app_id 前拼接上 `wb` 的形式,例如:wb18xxx851 不包含大括号 -->
        <string>wb{weibo__app_id}</string>
    </array>
    </dict>
    <!-- 小红书 相关 -->
    <dict>
    <key>CFBundleTypeRole</key>
    <string>Editor</string>
    <key>CFBundleURLName</key>
    <string>xhs</string>
    <key>CFBundleURLSchemes</key>
    <array>
        <!-- 这里注意下,最终是 xhs__app_id_ios 前拼接上 `xhs` xhs5dxxxdee 不包含大括号 -->
        <string>xhs{xhs__app_id_ios}</string>
    </array>
    </dict>
    <!-- 抖音 相关 -->
    <dict>
    <key>CFBundleTypeRole</key>
    <string>Editor</string>
    <key>CFBundleURLName</key>
    <string>douyin</string>
    <key>CFBundleURLSchemes</key>
    <array>
        <!-- 这里注意下,直接使用 douyin__app_id 即可,不包含大括号 -->
        <string>{douyin__app_id}</string>
    </array>
</dict>
</array>
3. Queries Schemes设置
自己 APP 唤起三方 APP 需要设置白名单,示例如下(不需要的可以删掉):
<key>LSApplicationQueriesSchemes</key>
<array>
    <!-- TapTap 相关 -->
    <string>tapsdk</string>
    <string>tapiosdk</string>
    <string>taptap</string>
    <!-- Facebook 相关 -->
    <string>fbapi</string>
    <string>fb-messenger-share-api</string>
    <!-- Line 相关 -->
    <string>lineauth2</string>
    <!-- Twitter 相关 -->
    <string>twitterauth</string>
    <!-- 微博 相关 -->
    <string>sinaweibo</string>
    <string>weibosdk</string>
    <string>weibosdk2.5</string>
    <string>weibosdk3.3</string>
    <!-- QQ 相关 -->
    <string>mqqopensdkapiV2</string>
    <string>mqq</string>
    <string>mqqapi</string>
    <string>tim</string>
    <string>mqqopensdknopasteboard</string>
    <!-- 微信 相关 -->
    <string>weixin</string>
    <string>weixinULAPI</string>
    <string>weixinURLParamsAPI</string>
    <!-- 小红书 相关 -->
    <string>xhsdiscover</string>
    <!-- 抖音 相关 -->
    <string>douyinopensdk</string>
    <string>douyinliteopensdk</string>
    <string>douyinsharesdk</string>
    <string>snssdk1128</string>
</array>
4. 相关平台的一些特殊配置
<!-- 需要修改成自己的参数 -->
<key>FacebookAppID</key>
<string>892901278532077</string>

<key>FacebookClientToken</key>
<string>52372eb46fd7343e588160c51ca0955d</string>
iOS配置详解 - Entitlements 文件设置
Apple 登录
在文件 DefaultEngine.ini 添加如下配置:
[/Script/IOSRuntimeSettings.IOSRuntimeSettings]
bEnableSignInWithAppleSupport=True
Apple 推送
在文件 DefaultEngine.ini 添加如下配置:
[/Script/IOSRuntimeSettings.IOSRuntimeSettings]
bEnableRemoteNotificationsSupport=True
GameCenter/Associated Domains/Keychain Sharing
原生不支持,需要修改引擎脚本
-
修改
Engine/Source/Programs/UnrealBuildTool/Platform/IOS/IOSExports.cspublic static void WriteEntitlements(UnrealTargetPlatform Platform, ConfigHierarchy PlatformGameConfig,
string AppName, FileReference MobileProvisionFile, bool bForDistribution, string IntermediateDir)
{
// ...已有代码...
// 找到这段内容
// for Sign in with Apple
bool bSignInWithAppleSupported = false;
PlatformGameConfig.GetBool("[/Script/IOSRuntimeSettings.IOSRuntimeSettings]", "bEnableSignInWithAppleSupport", out bSignInWithAppleSupported);
if (bSignInWithAppleSupported)
{
Text.AppendLine("\t<key>com.apple.developer.applesignin</key>");
Text.AppendLine("\t<array><string>Default</string></array>");
}
// 新增代码
// for Game Center
bool bGameCenterEnabled = false;
PlatformGameConfig.GetBool("[/Script/IOSRuntimeSettings.IOSRuntimeSettings]", "bEnableGameCenterSupport", out bGameCenterEnabled);
if (bGameCenterEnabled)
{
Text.AppendLine("\t<key>com.apple.developer.game-center</key>");
Text.AppendLine("\t<true/>");
}
// for Assocaited Domains
string AssociatedDomains = "";
PlatformGameConfig.GetString("[/Script/IOSRuntimeSettings.IOSRuntimeSettings]", "iOSAssociatedDomains", out AssociatedDomains);
if (!string.IsNullOrEmpty(AssociatedDomains))
{
Text.AppendLine("\t<key>com.apple.developer.associated-domains</key>");
Text.AppendLine("\t<array>");
foreach (string domain in AssociatedDomains.Split(new[] { ',' }, StringSplitOptions.RemoveEmptyEntries))
{
Text.AppendLine($"\t\t<string>{domain.Trim()}</string>");
}
Text.AppendLine("\t</array>");
}
// for Keychain Sharing
string KeychainAccessGroups = "";
PlatformGameConfig.GetString("[/Script/IOSRuntimeSettings.IOSRuntimeSettings]", "iOSKeychainAccessGroups", out KeychainAccessGroups);
if (!string.IsNullOrEmpty(KeychainAccessGroups))
{
Text.AppendLine("\t<key>keychain-access-groups</key>");
Text.AppendLine("\t<array>");
foreach (string group in KeychainAccessGroups.Split(new[] { ',' }, StringSplitOptions.RemoveEmptyEntries))
{
Text.AppendLine($"\t\t<string>{group.Trim()}</string>");
}
Text.AppendLine("\t</array>");
}
// 结束
// ...已有代码...
} -
使用
msbuild工具重新编译UnrealBuildTool,即在Engine/Source/Programs/UnrealBuildTool目录运行Terminal指令msbuild来重新编译(如果引擎目录在一些不可编辑的目录下,可以加上sudo命令,即sudo msbuild)。 -
Game Center 需要在文件 DefaultEngine.ini 添加如下配置:
[/Script/IOSRuntimeSettings.IOSRuntimeSettings]
bEnableGameCenterSupport=True -
Assocated Domains 需要在文件 DefaultEngine.ini 添加如下配置:
[/Script/IOSRuntimeSettings.IOSRuntimeSettings]
;值可按需添加,多个以逗号分割
iOSAssociatedDomains=applinks:www.xd.com -
Keychain Sharing 需要在文件 DefaultEngine.ini 添加如下配置:
[/Script/IOSRuntimeSettings.IOSRuntimeSettings]
;值可按需添加,多个以逗号分割
iOSKeychainAccessGroups=$(AppIdentifierPrefix)com.google.GIDSignIn
Android配置详解
1. 拷贝某些平台要求的配置
可以建立两个文件夹叫 app 和 assets
- app 放入拷贝到项目根目录的文件,例如 google-services.json(谷歌服务)、**agconnect-services.json(华为推送)**等文件
- assets 放入拷贝到项目 assets 的文件,例如 supplierconfig.json(OAID 的配置)等文件
最后通过 UPL 将文件拷贝过去
<resourceCopies>
    <copyDir src="$S(PluginDir)/Your Path/app/" dst="$S(BuildDir)/gradle/app/"/>
    <copyDir src="$S(PluginDir)/Your Path/assets/" dst="$S(BuildDir)/assets/"/>
</resourceCopies>
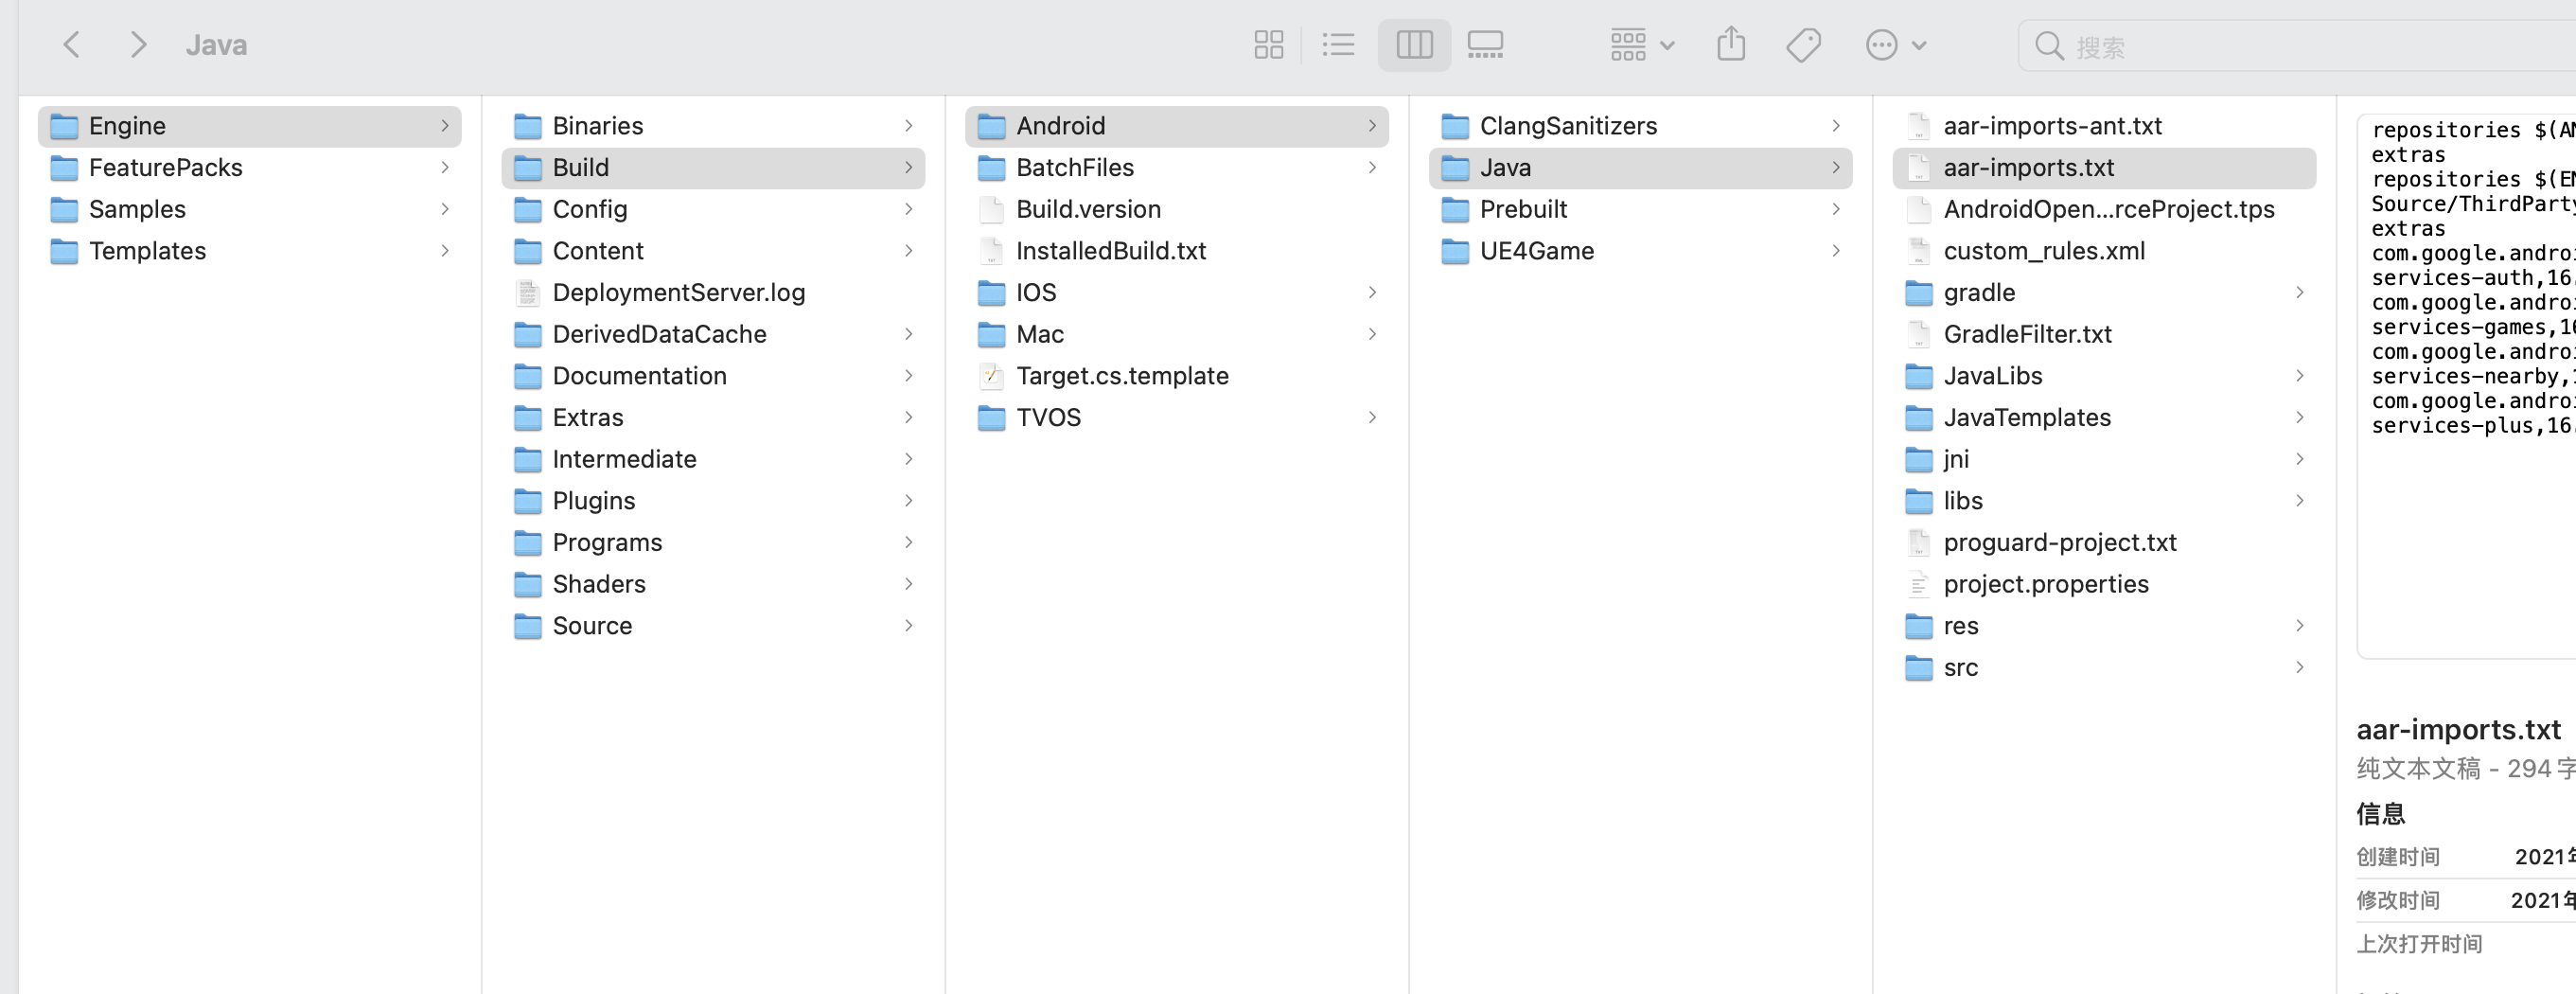
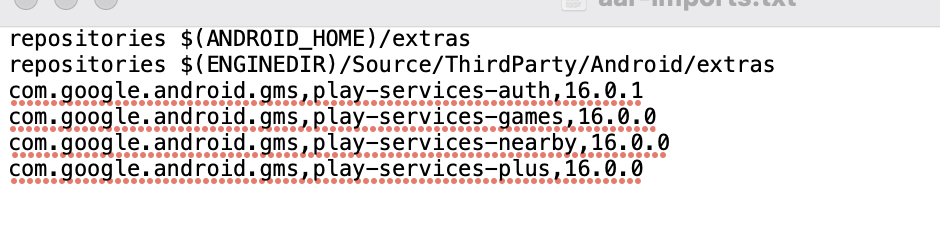
2. 如果接入的时候有报谷歌 gms 包冲突的话,可以修改 Engine/Build/Android/Java/aar-imports.txt 中对应的 gms 版本号。

3. 配置
需要再 Android 加载的配置,参考如下,改成自己的配置,不用的可以删掉:
<androidManifestUpdates>

    <addElements tag="$">

        <queries>
            <!-- Android 11 软件包可见性 -->
            <package android:name="com.taptap"/>
            <package android:name="com.taptap.pad"/>
            <package android:name="com.taptap.global"/>
            <!-- Toss -->
            <package android:name="viva.republica.toss"/>
            <!-- gojek -->
            <package android:name="com.gojek.app"/>
            <!-- line -->
            <package android:name="jp.naver.line.android"/>
            <!-- facebook -->
            <package android:name="com.facebook.katana"/>
            <!-- Twitter -->
            <package android:name="com.twitter.android"/>
            <!-- LINE -->
            <package android:name="jp.naver.line.android"/>
            <!-- wechat-->
            <package android:name="com.tencent.mm"/>
            <!-- qq -->
            <package android:name="com.tencent.mobileqq"/>
            <!-- qq 空间-->
            <package android:name="com.tencent.qzone"/>
            <!-- weibo-->
            <package android:name="com.sina.weibo"/>
            <!-- Android 11 软件包可见性 针对网页支付 上架 taptap.io 用到网页支付必配-->
            <intent>
                <action android:name="android.support.customtabs.action.CustomTabsService"/>
            </intent>
        </queries>

    </addElements>

</androidManifestUpdates>
PC 端配置
Steam 登录 & 支付
如果需要启用 Steam 账号登录或者 Steam 支付,需要开启 "OnlineSubsystemSteam" 插件并设置 bSteamSDKLoginEnable 为 true
Epic 内购
如果需要开启 Epic 内购,需要设置以下参数
; EOS settings
eos__enabled=True 开启 EOSSDK
eos__product_id="eos__product_id"
eos__client_id="eos__client_id"
eos__client_secret="eos__client_secret"
常见问题
[Android] 升级 OAID 库与其他库有冲突?
构建 Android App 时提示 OAID 库与其他库有 android:allowBackup 属性冲突,这里推荐游戏以 OAID 的配置为准,在 AndroidManifest.xml 文件中的 <application> 节点添加以下属性:
...
<manifest>
   <application
        ...
        xmlns:tools="http://schemas.android.com/tools"
        android:allowBackup="false"
        tools:replace="android:allowBackup" >
        ...
   </application>
</manifest>
...
当然,如果有特殊需求,可以将 android:allowBackup 的属性设置为 true,关于 android:allowBackup 属性的说明请参考 Google 官方文档,请按照实际需求来变更需要的属性。
在 UE 的项目中,需要通过 ini 文件 添加以上内容
[/Script/AndroidRuntimeSettings.AndroidRuntimeSettings]
+ExtraManifestNodeTags=xmlns:tools="http://schemas.android.com/tools"
+ExtraApplicationNodeTags=tools:replace="android:allowBackup"
+ExtraApplicationNodeTags=android:allowBackup="false"
[Android] 接入海外版本的 XDSDK 网页支付支付结束之后无法跳转回游戏?
请参考Android 网页支付配置相关内容进行配置更改,请注意 xd_client_id 的全小写匹配规则。